I wanted to share a few of my favorite summertime beauty items! :)
It has been super hot and HUMID lately here in Maryland. So, I've been skipping foundation and came to LOVE MAC's BB (Beauty Balm) Cream. My shade is Dark Deep. I apply it with a stipple brush and it blends right into my skin. You can also use your hands (clean, of course) or a sponge.
What is a BB Cream? Many beauty lines carry them now. Basically, think of it like tinted moisturizer on steroids. The MAC one has SPF 35, which I love. It brightens my complexion and evens it out but gives light to medium coverage. It feels very light on my skin and I haven't had to use concealer in addition to it. Go to your local MAC store/counter and try it out! Also available online :)
A great eyeliner to try - especially if you have oily eyelids even with primer - is by Stila (Stay All Day Waterproof Liquid Liner). It doesn't fade, smear, rub off - it's perfect. To remove, just use an eye makeup remover before washing your face for the night. It will come off easily.
Showing posts with label Makeup and Beauty. Show all posts
Showing posts with label Makeup and Beauty. Show all posts
Thursday, July 18, 2013

Saturday, August 11, 2012
CurlBox and Birchbox Reviews
Back with an update on 2 items I LOVE to get each month!! CurlBox (natural hair products for $20/month automatically shipped to your home) and Birchbox (beauty products for $10/month shipped to your home).
Please view the video for a quick recap of my August CurlBox and Birchbox contents :)
For information on how to get your own, please visit the following links: Curlbox www.curlbox.com, Birchbox www.birchbox.com.
If you have questions, please let me know! :) Enjoy your weekend.
Please view the video for a quick recap of my August CurlBox and Birchbox contents :)
For information on how to get your own, please visit the following links: Curlbox www.curlbox.com, Birchbox www.birchbox.com.
If you have questions, please let me know! :) Enjoy your weekend.
Friday, August 10, 2012
Removing Gel Nail Polish at Home... YES, YOU CAN!
Over the summer, I have been enjoying getting manicures with gel nail polish. It started while in school earlier this year. Having to wash my hands constantly and always having my hands in product due to giving facials and spa treatments to clients, my regular nail polish mani's weren't holding up as well. I fell in love with gel nail polish because I literally did NOT have to do my nails for 2-3 weeks. (My nails grow FAST so usually 2 weeks was my limit, though.) However, anyone who knows me also knows that I LOVE doing my own nails. It's almost therapeutic for me and allows me to be creative in yet another way. So, after this last set of gel nails, I wanted them off but didn't feel like going to the salon and paying them to do it. PLUS, I am also very picky about how it is removed and how my nails are filed (OCD much? Lol) so I decided I'd attempt to do it myself and have them done to my liking.
Read more for deets!
Read more for deets!
Saturday, June 16, 2012
It's Official

If you follow me on any of the MANY social networks I'm on (Facebook, Twitter, Instagram, Tumblr), then you already know I am OFFICIALLY a licensed Esthetician now. The experience in school was a great one - although I was super tired - but God gave me the strength to finish. I've worked so hard the last 10 months and today I took my last exam with the State Board for my license and PASSED! I'm so happy, this has been a dream of mine for YEARS. I've always been interested in skincare (to the point I once considered being a dermatologist) and makeup and hair removal, so it only made sense to do this.
I've started a new Twitter page (@KeetaEsthetics) that will give skincare and makeup tips, so if you're on Twitter, definitely follow! Feel free to ask questions, too :) I will answer the best I can.
~KeetaRay~
Tuesday, March 6, 2012
My Beauty Product and Makeup Staples
I must love you all... because I'm about to share some of my secrets! People often ask me what products I use on my skin or what makeup I use... Below are some of my favorite items that I use daily, or close to it!
1. Aveeno Positively Radiant Facial Moisturizer: Has SPF 15 which is important! Also, if you deal with hyperpigmentation, sunscreen is a must. I use this every single day whether it's sunny out or not.
 2. Aveeno Positvely Radiant Cleansing Pads: One side is soft for regular cleansing and the other side is exfoliating. I use the exfoliating side twice a week. Tip: The pads are HUGE so I cut them in half to wash my face, and use the other half the next day. They last me twice as long :)
 3. Neutrogena Eye Makeup Remover: Shake it up and use a cotton ball for removing your eye makeup. Never EVER sleep with your makeup on, ladies. EVER.
 4. L'oreal True Match Powder: My color alternates between W7 or W8. I'm an 8 in the summer, 7 in the winter. Sometimes I use "N" (neutral) if the store is out of "W" (warm). Don't know your undertone? Generally, golden undertones are Warms and cooler/blue undertones are Cool. What I love about these powders and foundations is that if you're unsure, neutral will work! :)
 5. MAC Spiked Brow Pencil: I've tried many brow pencils. For YEARS. This is my fave. I guess because it's so thin and precise so I can give my brows more detail. I use this every day. Brows frame the face - there is nothing worse than a made up eye and fab lashes, and an eyebrow that isn't groomed or properly filled in. Here is a tutorial on how I do my brows.

1. Aveeno Positively Radiant Facial Moisturizer: Has SPF 15 which is important! Also, if you deal with hyperpigmentation, sunscreen is a must. I use this every single day whether it's sunny out or not.
Wednesday, January 25, 2012
Dry, Chapped Lips? Here's a Remedy...

We’ve all been there a time or two… or 50. Lol Dry, chapped lips. What a pain! But there is an easy and affordable way to solve this issue. I used to buy lip scrubs, and they can get pricey depending on the brand and where you buy them. Then, I figured out how to make my own and it has been working like a charm

- Make a fast lip scrub using coarse, raw sugar and water. Put a teaspoon of sugar into the palm of your hand. With your finger, mix a few drops of water into the sugar to make a paste, and then spread it on your lips with your fingertip. Lick it away or rinse your lips with warm water, then apply a layer of olive oil and let it soak in.
- Try a honey lip scrub by mixing a teaspoon of honey, a teaspoon of baking soda and a few drops of olive oil in your hand. Smear it gently into your lips and let it sit for a few minutes. Rub your lips together to remove extra dead skin, and then rinse it away with warm water. Apply more olive oil to your lips while they’re still wet, and blot dry with a clean, soft cloth.
You can use the above everyday or every other day, as needed.
Say hello to smooth, soft lips!!
Friday, January 6, 2012
Glowing GREEN Smoothie!
First off - HAPPY NEW YEAR!!! 6 days in. Lol It's been busy already.
Anywho, I want to tell you all about this healthy smoothie I've become privy to from a woman I posted about not too long ago. Heather Lindsey posted about this Glowing Green Smoothie (GGS) on her blog. I thought it was interesting but at the time I had no desire to try it. However, as I've been getting older I feel the need to do more for my health and be better to myself, inside out. So, I reconsidered. And I checked out the site of the young lady where this originated from - her name is Kimberly Snyder and her website explains all about detox and diet/health, etc.
Anywho, I want to tell you all about this healthy smoothie I've become privy to from a woman I posted about not too long ago. Heather Lindsey posted about this Glowing Green Smoothie (GGS) on her blog. I thought it was interesting but at the time I had no desire to try it. However, as I've been getting older I feel the need to do more for my health and be better to myself, inside out. So, I reconsidered. And I checked out the site of the young lady where this originated from - her name is Kimberly Snyder and her website explains all about detox and diet/health, etc.
Monday, January 2, 2012
"Natural" Makeup Products
For those who are anti-makeup and/or don't want to look "made up", you should know that makeup CAN look natural. In the pic below I am wearing a full face of makeup.

Concealer: Mary Kay in Light Bronze
Foundation: The Body Shop's Oil Free Liquid Foundation in #10 (SPF 15)
Brows: Filled in lightly with Milani Brow Kit in #3
Mascara: Maybelline Colossal Lash in Black
Blush: The Body Shop in #07
Lips: Lip Pencil in MAC Chestnut, MAC Fresh Brew Lipstick, MAC C-Thru Lipglass
This is my fave natural/toned-down look. As you can see, I use what works for me. I am not partial to just one brand. :)

Concealer: Mary Kay in Light Bronze
Foundation: The Body Shop's Oil Free Liquid Foundation in #10 (SPF 15)
Brows: Filled in lightly with Milani Brow Kit in #3
Mascara: Maybelline Colossal Lash in Black
Blush: The Body Shop in #07
Lips: Lip Pencil in MAC Chestnut, MAC Fresh Brew Lipstick, MAC C-Thru Lipglass
This is my fave natural/toned-down look. As you can see, I use what works for me. I am not partial to just one brand. :)
Thursday, December 29, 2011
Uneven Skin? What You Can Do About It...

I've received requests to address the problem of uneven skin/complexion - what causes it and how can it be fixed? Now, let me start by saying I am not yet an expert on this, but I have some experience with it firsthand and have learned quite a bit about it in the last few months. I know this is an issue many women and men, alike, deal with.
Wednesday, August 31, 2011
My Nails This Week...
I purchased quite a few new nail colors over the weekend (didn't I say I was on "strike" from buying anymore? How soon I forget... but I got a good hook-up. Lol). I did my nails yesterday and this is the final look.

 Nail colors used: OPI "Stranger Tides" from Pirates of the Caribbean line, and OPI "White Shatter" on my ring finger. On my index finger I just used a white nail polish I had lying around.


Tuesday, August 16, 2011
Back 2 MAC Program
Although I've known about MAC Cosmetics' "Back 2 MAC" program, I never have done it. I don't know why, maybe I just kept forgetting to get all my empty containers together. But for those who are unaware, MAC's Back 2 MAC allows you to give 6 (six) empty primary packaging containers (for recycling) to a MAC store/counter, and in turn you get a free lipstick color of your choice. By primary packaging they mean only the actual container that the product came in (like the lipglass tube, lipstick tube, the compact a powder was in, etc.) - That does not include things like the bubble wrap, the boxes, etc. (hey, some people need it spelled out. Lol) You can also send the empty packages in and they will ship the lipstick to you free of charge. Check out MAC's "Back 2 MAC" web link for more details :)
This week I'll be getting my free lipstick. I'll let you know what I chose!
This week I'll be getting my free lipstick. I'll let you know what I chose!
Thursday, August 11, 2011
Sephora by OPI
I painted my nails with a new color I got last week. Sephora by OPI in "Caught with My Khakis Down". Lovin' it.


MAC Lips :)
As much as I blog about hair, I love makeup 100xs more! I need to blog about it more often, I could literally talk about it ALL DAY and I do with friends who share the same love.
Anywho... today I am wearing MAC Matte lipstick in Please Me with Chestnut liner, and Plushglass in Ample Pink on top. Click link for pics...
Anywho... today I am wearing MAC Matte lipstick in Please Me with Chestnut liner, and Plushglass in Ample Pink on top. Click link for pics...
Wednesday, June 8, 2011
"Newspaper Nails"
I came across this manicure idea yesterday - I don't even remember how I stumbled upon it. But after seeing the 1st YouTube video, I went to Google to search for "Newspaper Nails" and tons of blog posts and vids came up for this cute little technique. I like to be creative, especially when it seems easy, so I had to give it a try. What I loved is that I didn't have to buy anything new for this so if it was a #Fail, no money lost :)
Click the jump for pics and details!
Click the jump for pics and details!
Tuesday, March 1, 2011
Review! Sally Hansen Salon Effects
I've been gone for too long!
I want to do something I've never done on this blog before. Post a nail review! :) My close friends know I am very particular about my nails. To the point I am often dissatisfied with getting mani's b/c they just "never do them right". Yes, I am OCD. I love doing my own nails and recently experimented with Sally Hansen's Salon Effects nail appliques! I purchased them from CVS for about $10. Check it out:

Tons of designs. I tried the leopard print ones. What can I say, I am drawn to animal prints :)
Here is a pic of my nails right after I applied them this past Friday:
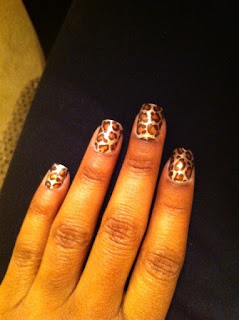 Super-easy (I feel they were) to apply. Today is Day 4 and they're holding up well:
 My nails grow fast as you can see at my cuticle. But the tips are not chipping and I don't have any cracks/chips in the polish. I did apply a clear coat on Day 2. The product instructions don't require this but I did this just off my gut. Lol
Here are the basic application tips -
Application tips:
**Updated March 4, 2011:
It's Day 7 of having these applique's on and they are holding up very well. I'm sorry but regular nail polish would have chipped by now. If you're used to get manicures weekly for about $10, the price of this kit is no biggie. I may do this every other week - Just until I get tired of the designs. :-o Take a look at the pic for Day 7 -

I want to do something I've never done on this blog before. Post a nail review! :) My close friends know I am very particular about my nails. To the point I am often dissatisfied with getting mani's b/c they just "never do them right". Yes, I am OCD. I love doing my own nails and recently experimented with Sally Hansen's Salon Effects nail appliques! I purchased them from CVS for about $10. Check it out:

Tons of designs. I tried the leopard print ones. What can I say, I am drawn to animal prints :)
Here is a pic of my nails right after I applied them this past Friday:


Here are the basic application tips -
Application tips:
- Warm the strips with your hands to make them more pliable.
- Bend the strip over your free edge and use the file to remove the excess rather than tearing it off. Tearing can result in an uneven edge.
- Between sizes? Size up and use the enclosed cuticle stick to remove the excess off your skin.
- Don’t submerge in water right after applying. I'd say wait about 1-2 hours or you risk the edges lifting a little.
**Updated March 4, 2011:
It's Day 7 of having these applique's on and they are holding up very well. I'm sorry but regular nail polish would have chipped by now. If you're used to get manicures weekly for about $10, the price of this kit is no biggie. I may do this every other week - Just until I get tired of the designs. :-o Take a look at the pic for Day 7 -

Subscribe to:
Posts (Atom)